Extend Admin UI
The final section of the book has a deeper look at how to integrate your own entities and corresponding views into the Sulu administration interface. This includes adding new items to the navigation and configuring list views and form views for your entity.
Note
The Sulu workshop is a great supplementary resource to this document. It consists of 12 assignments that guide you through creating a small website that integrates two simple custom entities. Additionally, the Sulu Demo repository contains multiple pull requests that demonstrate how to extend different parts of the administration interface using simple examples.
Sulu is built with extensibility as a core value and allows the integration of a custom entity without writing any JavaScript code in most cases. In order to provide this extensibility in a simple way, Sulu requires the APIs used for managing the entities follow some rules. If you provide such an API, Sulu comes with a variety of existing frontend views and components that cover a lot of different use cases. Furthermore, once you have reached the limits of the existing components, Sulu provides various extension points of different granularity allowing you to hook into most areas of the system using custom JavaScript code. A description of the JavaScript views, services and components of the administration interface frontend and its extension points is available in the Sulu Javascript Docs.
As stated above, the frontend components coming with Sulu expect that your APIs deliver the data for the administration interface to match a certain standard. These standards affect the data for the list and form views that will be used to manage your entity. Sulu uses the FOSRestBundle internally to build the REST APIs for the preexisting entities, but the data format expected by the frontend components is completely architecture agnostic and library independent. Therefore Sulu does not enforce how to actually implement the API for your entity - you can try to keep your code as simple as possible by following the Symfony Best Practices, go full DDD or anything between.
The following sections will list the requirements for your API to be compatible with the Sulu frontend components. To keep things practical, the sections will use a custom Event entity as an example.
First of all, Sulu expects your API to expose the standard REST actions. In the case of our EventController this
means there has to be a POST action for creating events, a PUT action for modifying events, a DELETE action
for deleting events and finally a GET action for retrieving information about an event. The POST, PUT and
GET actions accept and return a JSON serialization of the event entity. The serialization could look something
like this:
{
    "id": 1,
    "name": "Sulu Con 2020",
    "startDate": "2020-10-24T08:00:00",
    "endDate": "2020-10-25T18:00:00"
}
A JSON object like this can be sent to the POST action (without the ID) to create a new event or to the PUT
action to update an existing event. Both of the previous actions must return a response in the same format as the
GET action.
Furthermore, Sulu expects the URLs of your API to follows certain rules. All these actions are encapsulated behind the
same URL, in the event case e.g. /admin/api/events. This endpoint returns a paginated list of available entities
when it receives a GET request and creates a new event when it receives a POST request with a JSON object like
shown above.
There has to be a sub URL including the ID for single events as well. E.g. the URL /admin/api/events/5 represents
the event with the ID 5. This endpoint will accept a GET request to return a JSON object like above, a PUT
request to update the event using a JSON object and a DELETE request to delete the event (this one does not need
any data).
For your own entities you only have to implement the actions you really need. E.g. if you have an entity that cannot be
deleted afterwards, then you don’t have to implement the DELETE action. However, then you have also to make sure
that you don’t activate any deletion functionality in the administration interface.
List configuration and controller
This section assumes that you have a RestController with some actions already located at
src/Controller/Admin/EventController and will add a cgetAction. After finishing the action will be tied to the
/admin/api/events endpoint, and should return a paginated list.
The list integrated in Sulu comes already with quite some features, including pagination, search, sorting and so on.
However, these functionalities also have to be implemented by the REST API the list talks to. Since it would be quite
some work to implement this for every REST API you are offering, we have build an abstraction that is doing that for
you in a very efficient manner. This abstraction is called ListBuilder, and uses some metadata to generate queries.
It will only join tables that are absolutely necessary for the result of the query and is also capable of filtering,
sorting, searching and so on. Apart from that responses created with the ListBuilder will already match the
conventions required by the list in the administration interface.
Let’s assume that we have this very simplified entity enriched with doctrine annotations already available at
src/Entity/Event.php:
<?php

namespace App\Entity;

use Doctrine\ORM\Mapping as ORM;

#[ORM\Entity]
class Event
{
    const RESOURCE_KEY = 'events';


    #[ORM\Id]
    #[ORM\GeneratedValue]
    #[ORM\Column(type: 'integer')]
    private $id;

    #[ORM\Column(type: 'string')]
    private $name;

    #[ORM\Column(type: 'datetime_immutable')]
    private $startDate;

    #[ORM\Column(type: 'datetime_immutable')]
    private $endDate;
}
Note
The RESOURCE_KEY constant uniquely identifies this entity, and will be explained in more detail later.
This entity already contains some information about how the entity is structured and which properties it is holding, but that is not enough information to build a full-fledged list in Sulu. For this reason we need some additional metadata, e.g. should each of the property be visible in the list by default, can the list be sorted based on this property, should it be included in a search and so on. In addition to that it is also possible to define the header and a type, which describes how to format the content (e.g. a type of datetime will make sure that the date is displayed correctly based on the localization of the user).
XML files are used to define this metadata. By default, these list configuration XML files are located in the
config/lists directory of your project and an example looks like this:
<?xml version="1.0" ?>
<list xmlns="http://schemas.sulu.io/list-builder/list">
    <key>events</key>

    <properties>
        <property name="id" visibility="no" translation="sulu_admin.id">
            <field-name>id</field-name>
            <entity-name>App\Entity\Event</entity-name>
        </property>

        <property name="name" visibility="always" searchability="yes" translation="sulu_admin.name">
            <field-name>name</field-name>
            <entity-name>App\Entity\Event</entity-name>
        </property>

        <property name="startDate" visibility="yes" translation="app.start_date" type="datetime">
            <field-name>startDate</field-name>
            <entity-name>App\Entity\Event</entity-name>
        </property>

        <property name="endDate" visibility="yes" translation="app.end_date" type="datetime">
            <field-name>endDate</field-name>
            <entity-name>App\Entity\Event</entity-name>
        </property>
    </properties>
</list>
The root tag is called list and has two sub tags: The key tag contains a key that must be unique among all
defined lists. Usually it is a safe bet to just reuse the above RESOURCE_KEY constant of the Event entity,
unless you want to have different lists for the same entity.
Afterwards the properties tag lists all properties available in this list. Each property is described by a
property tag. These tags consist of a few attributes:
The
nameattribute defines the name of the property in the representation returned by theListBuilder.The
visibilityattribute allows to define if the property can be excluded from the list and if it is shown by default. A value ofyesornoonly describes if it is shown by default, but the setting can be changed by the user.neverandalwaysdo the same, but the don’t allow the user of the system to change this settings.The
translationattribute takes a translation key, which is resolved by the Symfony Translations component and uses this value as the header for the given column in the list. All translations are taken from theadmintranslation domain, so make sure that the file is called something likeadmin.en.json.The
searchabilityattribute describes if the value of this property is used by the search field in the list.Finally the
typeattribute allows to define how to display the content of this property. In the above example it is used to display the datetime value in the localization of the user. There is alistFieldTransformerRegistryextension point for these types, which allows to add more of them via JS.
In addition to these attributes the property tag has some sub tags as well. This includes the field-name
telling the ListBuilder how the column holding the value in the database is called, and the entity-name
describing which entity holds the property. Based on this information the ListBuilder can build a very efficient
query.
The Controller returning the data from the ListBuilder uses the FOSRestBundle as well. The cgetAction
calls the FieldDescriptorFactory to load the information written in the above XML file. It then uses the
DoctrineListBuilderFactory to get an instance of a DoctrineListBuilder, which implements the logic to load data
in an efficient way from the database. The RestHelper helps to set certain parameters of the ListBuilder from
the HTTP request, so that this code has not been copied over multiple times. Finally the PaginatedRepresentation
takes care of building an object representing the loaded data and enhance it with information like how many results
exist in total. This object will be serialized by the handleView method of the FOSRestBundle. The following code
shows a controller doing what has just been described.
<?php

namespace App\Controller\Admin;

use App\Entity\Event;
use FOS\RestBundle\Controller\Annotations\RouteResource;
use FOS\RestBundle\Routing\ClassResourceInterface;
use FOS\RestBundle\View\View;
use FOS\RestBundle\View\ViewHandlerInterface;
use Sulu\Component\Rest\ListBuilder\Doctrine\DoctrineListBuilderFactoryInterface;
use Sulu\Component\Rest\ListBuilder\Metadata\FieldDescriptorFactoryInterface;
use Sulu\Component\Rest\ListBuilder\PaginatedRepresentation;
use Sulu\Component\Rest\RestHelperInterface;
use Symfony\Component\HttpFoundation\Response;

/**
 * @RouteResource("event")
 */
class EventController implements ClassResourceInterface
{
    public function __construct(
       private ViewHandlerInterface $viewHandler,
       private FieldDescriptorFactoryInterface $fieldDescriptorFactory,
       private DoctrineListBuilderFactoryInterface $listBuilderFactory,
       private RestHelperInterface $restHelper
    ) {
    }

    public function cgetAction(): Response
    {
        $fieldDescriptors = $this->fieldDescriptorFactory->getFieldDescriptors(Event::RESOURCE_KEY);
        $listBuilder = $this->listBuilderFactory->create(Event::class);
        $this->restHelper->initializeListBuilder($listBuilder, $fieldDescriptors);

        $listRepresentation = new PaginatedRepresentation(
            $listBuilder->execute(),
            Event::RESOURCE_KEY,
            $listBuilder->getCurrentPage(),
            $listBuilder->getLimit(),
            $listBuilder->count()
        );

        return $this->viewHandler->handle(View::create($listRepresentation));
    }
}
Register your new Controller in the config/routes_admin.yaml file the following way:
app_events_api:
    type: rest
    prefix: /admin/api
    resource: App\Controller\Admin\EventController
    name_prefix: app.
Configure resources
At this point the controller should register its actions already as routes. If you have already created other actions
as well, then you should be able to see these actions when using the debug:router command from Symfony:
$ bin/adminconsole debug:router | grep event
  app.get_events     GET      ANY      ANY    /admin/api/events.{_format}
  app.post_event     POST     ANY      ANY    /admin/api/events.{_format}
  app.get_event      GET      ANY      ANY    /admin/api/events/{id}.{_format}
  app.put_event      PUT      ANY      ANY    /admin/api/events/{id}.{_format}
  app.delete_event   DELETE   ANY      ANY    /admin/api/events/{id}.{_format}
Note
To expose routes also to the admin frontend, you must use the FOSJsRoutingBundle and set the methods and the expose
parameter for the actions.
For example: options: ['expose' => true], methods: ['POST']. Further examples of exposed routes, can be found in the
Sulu Workshops, specifically assignment 10.
Sulu automatically exposes actions with names that match the regex pattern (.+\.)?c?get_.*.
If you want to verify the active rules for exposing routes, you can use the command bin/console debug:config fos_js_routing.
To confirm that your route is correctly registered, use the command bin/console fos:js-routing:debug.
These routes are spread over two different URLs, one without the ID (/admin/api/events) and one with the ID
(/admin/api/events/{id}). The first one is used to get a list of available events and to create new events, while
the latter is about already existing events.
The question is how to pass this information now to our administration JS application. One way would have been to
separately pass a getAction, a postAction, a deleteAction and so on to every part of the application that
needs something like this. This would be a bit tedious, therefore we decided to introduce a concept called resources.
Every resource is identified by a unique key, which we added as a constant to the Event entity above. So our
example uses events as the resource key. A list URL (/admin/api/events) and/or a detail URL
(/admin/api/events/{id}) will be assigned to every resource key. Afterwards the resource key can be used in
multiple places, without worrying about which exact actions have to be used.
This is done by using the sulu_admin.resources configuration. The following configuration can be placed e.g. in the
/config/packages/sulu_admin.yaml file of your project:
sulu_admin:
    resources:
        events:
            routes:
                list: app.get_events
                detail: app.get_event
The configuration makes use of the route names you have seen listed above by the debug:router command. For both
variants of the URL (/admin/api/events and /admin/api/events/{id}) one representative is used as a proxy for the
list and detail URL - whereby the detail URL has to be the one including the ID.
Admin class
After having registered the events resource, we can continue to include the events in the administration interface.
This is not done via a configuration, but in a separate Admin class. These Admin classes are registered as
services and collected by the system using tags, which in turn calls their methods. This approach has the advantage
that you can use other services when adding stuff to the administration interface.
The two most important hooks are for views and navigation items.
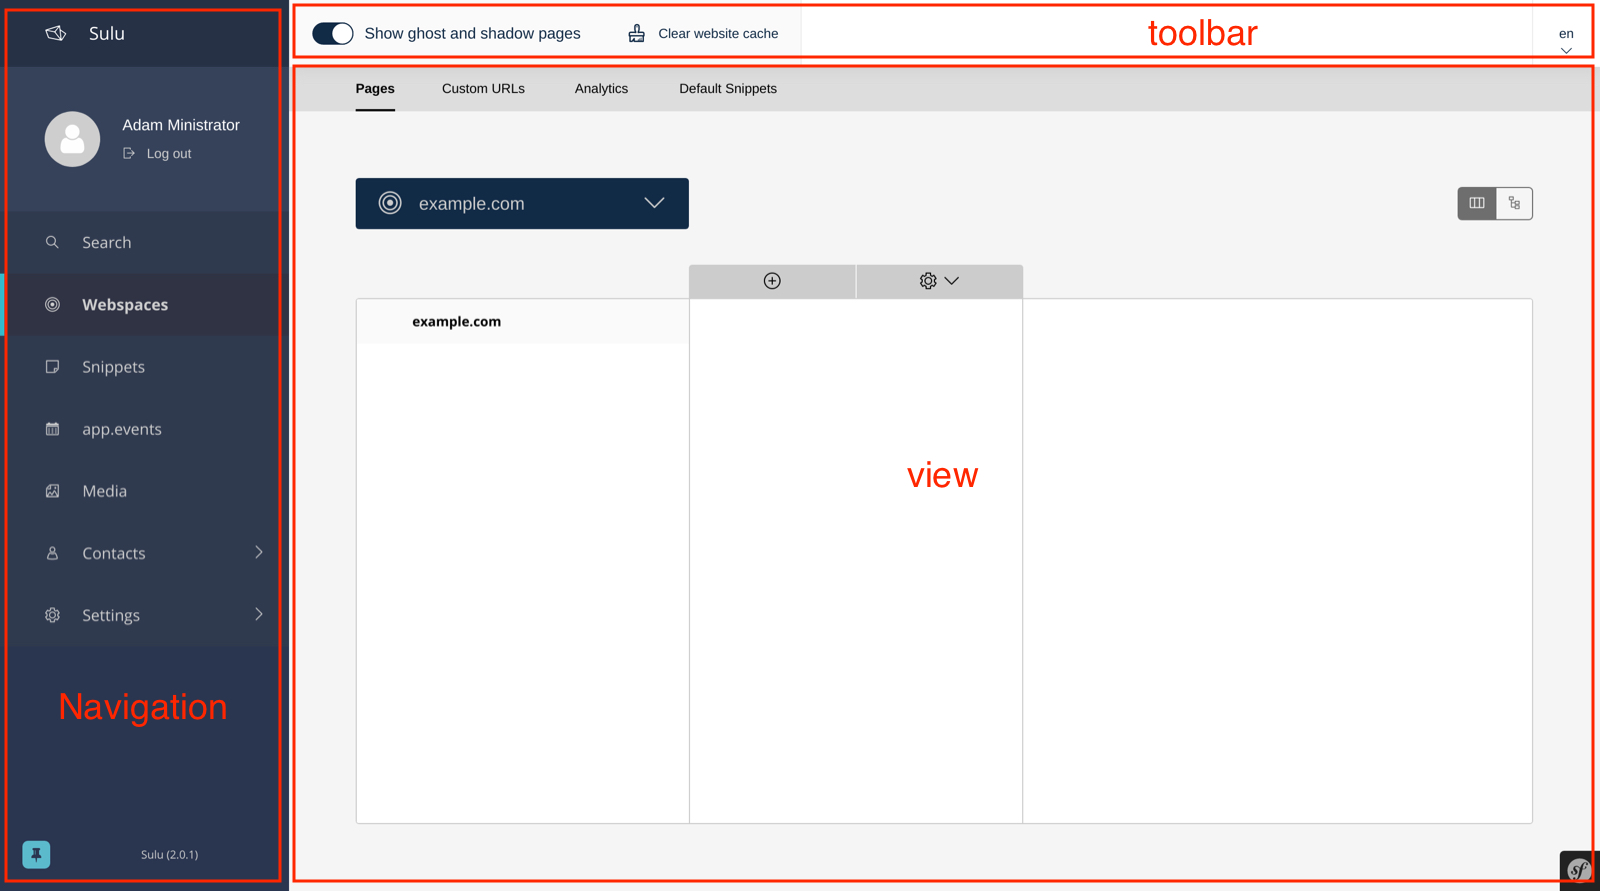
Views are React components, whereby Sulu comes with a few of them predefined. These predefined views can be configured via certain options, so that they are reusable in different contexts. Such a view takes most of the space of the screen, the only things being excluded from it being the toolbar on the very top of the screen and the navigation on the left.
Navigation items allow to add an item to the navigation on the left. Therefore they have to describe the title of this item and where to navigate when the user clicks on the item.
The EventAdmin class can be located e.g. at the /src/Admin folder of your project. The two important methods are
called configureNavigationItems and configureViews. The following example omits the implementation for these
methods, but it will be already correctly registered in the service container of Symfony without any configuration
because of the autoconfigure feature of Symfony:
<?php

namespace App\Admin;

use Sulu\Bundle\AdminBundle\Admin\Admin;
use Sulu\Bundle\AdminBundle\Admin\Navigation\NavigationItemCollection;
use Sulu\Bundle\AdminBundle\Admin\View\ViewBuilderFactoryInterface;
use Sulu\Bundle\AdminBundle\Admin\View\ViewCollection;

class EventAdmin extends Admin
{
    public function __construct(private ViewBuilderFactoryInterface $viewBuilderFactory)
    {
    }

    public function configureNavigationItems(NavigationItemCollection $navigationItemCollection): void
    {
        // add navigation items
    }

    public function configureViews(ViewCollection $viewCollection): void
    {
        // add views
    }
}
Configure list view
Views are the most important administration concept in Sulu. In JS a so called ViewRegistry exists, where a mapping
from a React component to a string is established. This string can be used as a key when defining views in the
previously mentioned Admin classes. Therefore a View class in PHP exists, which requires at least a name, a
path and a type. The name must be unique and is e.g. used to reference this specific view in different
places, e.g. for the routing in the JS application. The path defines under which URL this view is displayed, and
the type is the reference to the React component in the ViewRegistry.
Additionally the View class also has a setOption method, which allows to configure the View. This allows us
to build the predefined views mentioned above. So the behavior of views can be influenced by these options, so we can
e.g. tell a view representing a list to load a different type of resource and reuse a lot of logic, instead of
implementing these things twice. And it allows you to build nice lists with a lot of features being consistent in the
entire system without touching a single line of JS.
However, directly using the View class does not really offer a nice developer experience, because this class cannot
really validate anything. It has to accept everything, because Sulu does not know what views will be registered in the
future. For this reason the concept of ViewBuilders has been introduced. As the name suggests it is an
implementation of the Builder pattern, and provides a better interface to build specific views. For this purpose a
builder for each type of view has been implemented, which can consider the options required for each view. All of them
have in common that they share a getView method, which return a View object with the correctly set options. This
function can also validate the input and throw proper Exceptions in case some option does not make any sense.
All of these ViewBuilders are created by the ViewBuilderFactory, which is a service that has already been
injected in the code example of the Admin class above. The minimum code to only show a list with already existing
items looks like this:
<?php

namespace App\Admin;

use App\Entity\Event;
use Sulu\Bundle\AdminBundle\Admin\Admin;
use Sulu\Bundle\AdminBundle\Admin\View\ViewBuilderFactoryInterface;
use Sulu\Bundle\AdminBundle\Admin\View\ViewCollection;

class EventAdmin extends Admin
{
    const EVENT_LIST_VIEW = 'app.events_list';

    public function __construct(private ViewBuilderFactoryInterface $viewBuilderFactory)
    {
    }

    // ...

    public function configureViews(ViewCollection $viewCollection): void
    {
        $listView = $this->viewBuilderFactory->createListViewBuilder(static::EVENT_LIST_VIEW, '/events')
            ->setResourceKey(Event::RESOURCE_KEY)
            ->setListKey('events')
            ->addListAdapters(['table']);

        $viewCollection->add($listView);
    }
}
The createListViewBuilder method returns a ListViewBuilder, which already knows which type of view it needs.
Therefore we only need to name the view (app.events_list in this example), and tell Sulu on which URL it should be
rendered (/events). Then the previously defined resource key from the Configure resources section and the list
key from the XML in the List configuration and controller section are defined. The list adapters define how the list
shows the content it has loaded. There is a listAdapterRegistry JS extension point to register adapter, but for
now we use the table adapter, which makes use of an HTML table element.
Finally the View object has to be added to the ViewCollection, which is passed as the first parameter to the
configureViews method. This has been implemented like this to allow other bundles to further manipulate views that
have already been added by bundles registered previously.
The debug command can be used to check whether your view has been created correctly. sulu:admin:debug-view
$ bin/adminconsole sulu:admin:debug-view | grep event
  app.events_list     sulu_admin.list   /events
After that, an empty list should appear on ``/admin/#/events``. Once you add data to the event table, the list will populate with the new information:

Form configuration
The Form component in Sulu has the same problem as the List: The metadata we have delivered so far (including
the list and doctrine annotations) are not enough to render an actual form. The most important information missing is
how to render the information. Doctrine already gives us some information about the type, e.g. that a certain property
is a string, but Sulu still does not know how to render this information. A string could represented e.g. in a simple
input field, in a textarea or in a rich text editor. That is why we need more information in separate XML file.
Form configuration XML files are located in the config/forms directory of your project by default and look similar
to the following example:
<?xml version="1.0" ?>
<form xmlns="http://schemas.sulu.io/template/template"
    xmlns:xsi="http://www.w3.org/2001/XMLSchema-instance"
    xsi:schemaLocation="http://schemas.sulu.io/template/template http://schemas.sulu.io/template/form-1.0.xsd"
>
    <key>event_details</key>

    <properties>
        <property name="name" type="text_line" mandatory="true" colspan="12">
            <meta>
                <title>sulu_admin.name</title>
            </meta>
            <params>
                <param name="headline" value="true"/>
            </params>
        </property>

        <property name="startDate" type="date" mandatory="true" colspan="12">
            <meta>
                <title>app.start_date</title>
            </meta>
        </property>

        <property name="endDate" type="date" mandatory="true" colspan="12">
            <meta>
                <title>app.end_date</title>
            </meta>
        </property>
    </properties>
</form>
Since the problem is very similar to the List view, the metadata also looks quite similar. The root tag is called
form this time, and the first sub tag is a key, which has the same purpose as on lists: Uniquely identify
metadata for a form. Since many resources consist of many tabs in the administration interface there can potentially be
many forms for every resource. Therefore the key is usually not only the same as the resource key, but a suffix is
added.
Afterwards every field showing up in this specific form will be listed as a property tag. Each of the properties
has a few attributes:
nameis the key in the JSON returned from the server, so usually the name from the property on the entity.typedescribes how to render the value of the given property and makes use of so called field types. Sulu has afieldRegistryJS extension point containing all available field types.mandatorydefines if the field is required in order for the form to be submitted.colspanallows to define the width of the field. A value of12means that the entire available width is used, using smaller numbers result in an accordingly smaller field.disabledConditionallows to define a condition to render the field as disabled. It works the same way like for template properties.visibleConditionallows to define a condition to show or hide the field. It works the same way like for template properties.
Note
To display current values, the JSON returned from the server must provide the value with a key that matches the name of the field.
The format of the value of a field depends on the type of the field.
In general, the values returned by the server should be in the same format as the values which are sent to the server when the form is saved.
The property tag also has some sub tags: The meta tag contains the title tag, which takes a translation key
and uses the Symfony Translations component to get the texts for the Form component.
Note
If you do not want to use Symfony translations you can also pass a lang attribute to the title tag. In that
case the passed string will be used for the given language as it is.
Furthermore the params tag can be used to customize the fields in certain ways. E.g. you see in the above XML that
the name property has a parameter called headline being set to true. This will cause the field type
registered as text_line to render an input with a bigger font size. Every field type has its own set of
params it will act on. You can have a look at our documentation at Content Type Reference to learn
more about them.
Configure form views
In Configure list view you have already seen how to add a ListView. The same has to be done now for the event
forms. We need to separately register two different forms, because the edit and create form have different paths.
However, both of these forms consist of two different views in our example. That’s because Sulu allows to nest views as
well. You can assign a parent to each view, then this view will be rendered as child of its parent view (be aware that
the parent view must support this). In this case the parent view is a ResourceTabs view, which accepts multiple
children, whereby each of the children is shown as a separate tab. This example only makes use of a single tab, but if
you have multiple tabs you usually want to avoid that the same data is loaded over and over again every time you switch
between tabs. For this reason the responsibility of loading this data was moved to the ResourceTabs view. This view
will not be destroyed when switching between tabs, and therefore continues to hold the requested data from the server.
The child components of the ResourceTabs view will retrieve the data, and can make use of it without requesting it
again. For the events we use the Form view with the configuration already defined in Form configuration. This
will render a form with all the fields defined in the XML file. It is also necessary to define some so called
toolbarActions. These define which buttons should appear in the top toolbar of Sulu while this view is shown. The
same concept is also in place for the List view. Similar to other parts of the system, there is a
formToolbarActionRegistry and a listToolbarActionRegistry extension point that allow to register custom
toolbar actions that can be identified by a key string. In the Admin class the ToolbarAction class in
combination with the addToolbarActions method can be used to add elements to the toolbar. The ToolbarAction
class takes the key used in the registry as first constructor parameter, and an optional array containing some
settings specific to the toolbar action as the second. There are also some sub classes of ToolbarAction, e.g.
the DropdownToolbarAction, which have more specific constructors.
The following code applies all of the mentioned concepts:
<?php

namespace App\Admin;

use App\Entity\Event;
use Sulu\Bundle\AdminBundle\Admin\Admin;
use Sulu\Bundle\AdminBundle\Admin\View\ToolbarAction;
use Sulu\Bundle\AdminBundle\Admin\View\ViewBuilderFactoryInterface;
use Sulu\Bundle\AdminBundle\Admin\View\ViewCollection;

class EventAdmin extends Admin
{
    const EVENT_FORM_KEY = 'event_details';
    const EVENT_LIST_VIEW = 'app.events_list';
    const EVENT_ADD_FORM_VIEW = 'app.event_add_form';
    const EVENT_EDIT_FORM_VIEW = 'app.event_edit_form';

    public function __construct(private ViewBuilderFactoryInterface $viewBuilderFactory)
    {
    }

    public function configureViews(ViewCollection $viewCollection): void
    {
        $listView = $this->viewBuilderFactory->createListViewBuilder(static::EVENT_LIST_VIEW, '/events')
            ->setResourceKey(Event::RESOURCE_KEY)
            ->setListKey('events')
            ->addListAdapters(['table'])
            ->setAddView(static::EVENT_ADD_FORM_VIEW)
            ->setEditView(static::EVENT_EDIT_FORM_VIEW)
            ->addToolbarActions([new ToolbarAction('sulu_admin.add'), new ToolbarAction('sulu_admin.delete')]);

        $viewCollection->add($listView);

        $addFormView = $this->viewBuilderFactory->createResourceTabViewBuilder(static::EVENT_ADD_FORM_VIEW, '/events/add')
            ->setResourceKey(Event::RESOURCE_KEY)
            ->setBackView(static::EVENT_LIST_VIEW);

        $viewCollection->add($addFormView);

        $addDetailsFormView = $this->viewBuilderFactory->createFormViewBuilder(static::EVENT_ADD_FORM_VIEW . '.details', '/details')
            ->setResourceKey(Event::RESOURCE_KEY)
            ->setFormKey(static::EVENT_FORM_KEY)
            ->setTabTitle('sulu_admin.details')
            ->setEditView(static::EVENT_EDIT_FORM_VIEW)
            ->addToolbarActions([new ToolbarAction('sulu_admin.save'), new ToolbarAction('sulu_admin.delete')])
            ->setParent(static::EVENT_ADD_FORM_VIEW);

        $viewCollection->add($addDetailsFormView);

        $editFormView = $this->viewBuilderFactory->createResourceTabViewBuilder(static::EVENT_EDIT_FORM_VIEW, '/events/:id')
            ->setResourceKey(Event::RESOURCE_KEY)
            ->setBackView(static::EVENT_LIST_VIEW);

        $viewCollection->add($editFormView);

        $editDetailsFormView = $this->viewBuilderFactory->createFormViewBuilder(static::EVENT_EDIT_FORM_VIEW . '.details', '/details')
            ->setResourceKey(Event::RESOURCE_KEY)
            ->setFormKey(static::EVENT_FORM_KEY)
            ->setTabTitle('sulu_admin.details')
            ->addToolbarActions([new ToolbarAction('sulu_admin.save'), new ToolbarAction('sulu_admin.delete')])
            ->setParent(static::EVENT_EDIT_FORM_VIEW);

        $viewCollection->add($editDetailsFormView);
    }
}
The first thing that changed compared to the previous listing of the Admin class is that a few function calls to
the ListViewBuilder have been added. The setAddView and setEditView calls define to which views this list
is linked. The edit view is used when an element in the list is clicked. The List view will append the ID and
navigate to this view. The add view is similar, but is used when the toolbar action with the key sulu_admin.add is
clicked. This action is added using the addToolbarActions call along with the sulu_admin.delete toolbar action,
which allows to delete selected items from the list.
The views for the add and edit form look quite similar, except for the URLs they are using. Both of them make use of
the createResourceTabViewBuilder call returning a ResourceTabViewBuilder. Setting the resourceKey for this
view is mandatory, so that it knows which resource it should load. In the edit view we also define an :id parameter
in the path. Parameters are prefixed with a colon, and views can access their values. This way the ResourceTabs
know which resource it has to load. If a backView is set a back button appears in the toolbar, which navigates to
the given view.
Both Form views created by the createFormViewBuilder call look very similar as well. They need two different
keys: The resourceKey to load the correct resource for the form and the formKey to know which form fields to
display.
Note
Splitting into resourceKey and formKey does not seem to make a lot sense in this example, but if you have
bigger resources it might make sense to spread the fields over multiple different tabs, each showing a different
form.
The forms also get a tabTitle, which is a translation key being used as the title of a tab after it has been
translated. The addToolbarActions method adds the save and delete buttons. Then the form is attached to the correct
ResourceTabs view by setting it as their parent. Mind that the path of the forms only contains the part specific
to this tab. The path of the parent will be automatically prepended.
The only other difference between the add and edit form is that the add form needs to know where to navigate after the
resource has been successfully created. That is what the setEditView call is doing, which usually shows to the
corresponding edit form.
While it mostly does not make any sense to have multiple tabs in an add form (because Sulu will reset data when
switching between tabs) it is possible to add multiple edit form tabs to the ResourceTabs by adding more views with
the same parent. The main use cases for this are splitting a single resource into multiple tabs (use the same
resourceKey but different formKey) or if a resource has some sub resources (there is e.g. also the
FormOverlayList view which suits that use case very well).
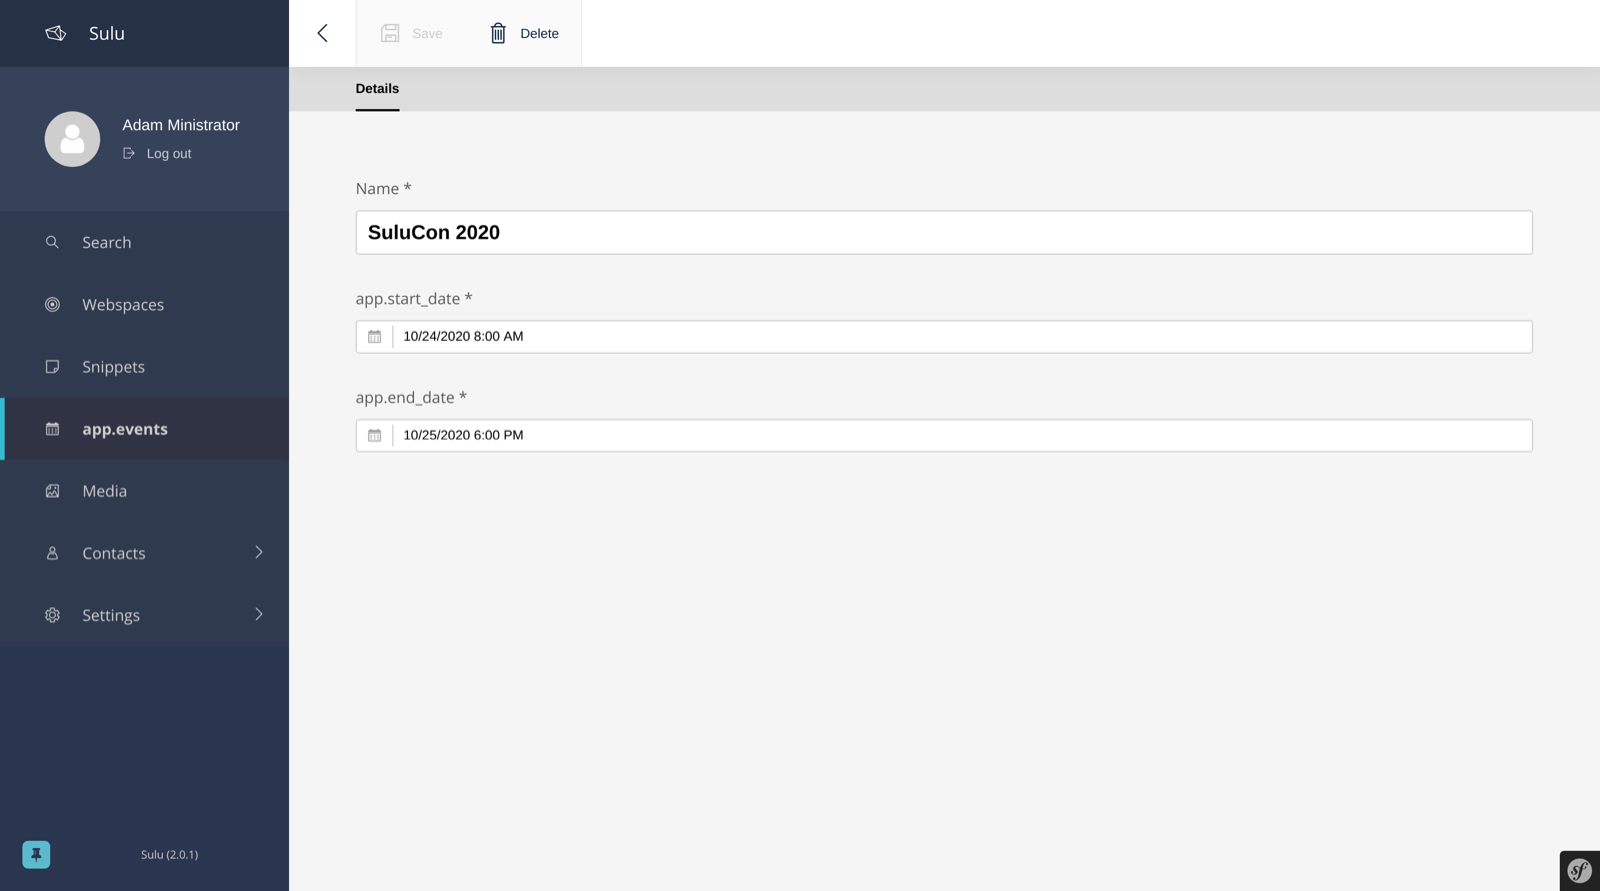
After successfully finishing the above steps you should be able to see the form you have configured when clicking the edit icon in the list or if you click the add button in the toolbar:
Selection field type
Most of the time it also makes sense for the resources resp. entities you are creating to be assigned at other places. In the event example it could e.g. make sense to have a field to select similar events to the current one, in order to show them on the website as well.
Since this is in our opinion a very important use case, we have tried to make creating such a field as easy as
possible. So, as with everything we have seen until now, it is not necessary to write a single line of JS in order to
make this work. Instead the concept of field_type_options exists, which allows to add additional field types based
on already existing ones customized by a certain set of options. Sulu comes with two abstract field types like this,
the selection and single_selection field type.
These two abstract field types can be registered using the Symfony Configuration. The following configuration shows how to register two field types, one for selecting a single and one for selecting multiple events.
sulu_admin:
    field_type_options:
        selection:
            event_selection:
                default_type: 'list_overlay'
                resource_key: 'events'
                view:
                    name: 'app.event_edit_form'
                    result_to_view:
                        id: 'id'
                types:
                    list_overlay:
                        adapter: 'table'
                        list_key: 'events'
                        display_properties:
                            - 'name'
                        icon: 'su-calendar'
                        label: 'app.events'
                        overlay_title: 'app.events'
        single_selection:
            single_event_selection:
                default_type: 'list_overlay'
                resource_key: 'events'
                view:
                    name: 'app.event_edit_form'
                    result_to_view:
                        id: 'id'
                types:
                    list_overlay:
                        adapter: 'table'
                        list_key: 'events'
                        display_properties:
                            - 'name'
                        icon: 'su-calendar'
                        empty_text: 'app.location.no_selections'
                        overlay_title: 'app.locations'
                    auto_complete:
                        display_property: 'name'
                        search_properties:
                            - 'name'
The field_type_options configuration key of the sulu_admin section is the one we need to set to register new
field types. The level below field_type_options are the names of the abstract field types, in our case
selection and single_selection. These are not the field types you can use, they only act as a boilerplate for
other field types.
These other field types are mentioned one level deeper, namely event_selection and single_event_selection, and
these are the field types that can be used as value in the type attribute of the form XML. The parent configuration
key describes which abstract field type is used as a blueprint. The configuration below depends on which blueprint has
been chosen.
Both abstract field types support different types. The selection allows to use an auto complete field (used e.g. by
the tag_selection), a full List component (e.g. category_selection) or a list overlay (e.g.
page_selection). The single_selection has similar options: There is also a list overlay and auto complete type.
Additionally it also offers a single_select type, which makes use of a standard dropdown element.
Two things every of the mentioned types share is the resource_key configuration, since all of the options have to
load some resource. This is again the string that has already be defined e.g. in the entity in the
List configuration and controller section.
The default_type you see in both configuration sections defines which of the configured types (you can configure
multiple types and use a param in the form XML to switch between them) is used if not specified otherwise.
Optionally a view configuration can be set. This configuration allows to define a deep link to the resulting UI. There are two differnent configuration values for the the view option: name describes the name of the view to link to, which needs to be the same as defined in the Admin class. The result_to_view configuration describes how to translate the properties from the result to the parameters of the route of the view. In many cases the id of the property should be mapped to the id parameter of the route, as it is done in the above example.
Some of the other properties in the above list_overlay configuration have already been explained in different parts
of this guide. The adapter describes how to display the list and the list_key defines which list XML
configuration to use. In addition to them the display_properties defines which properties to show in the field type
itself, the icon describes what is shown on the add button opening the overlay, label is the translation key used
in the header of the field type and overlay_title is the translation for the title in the overlay. In the single
variant you have an empty_text instead of a label, which is only displayed if nothing has been selected. This
is necessary because the element looks a bit different.
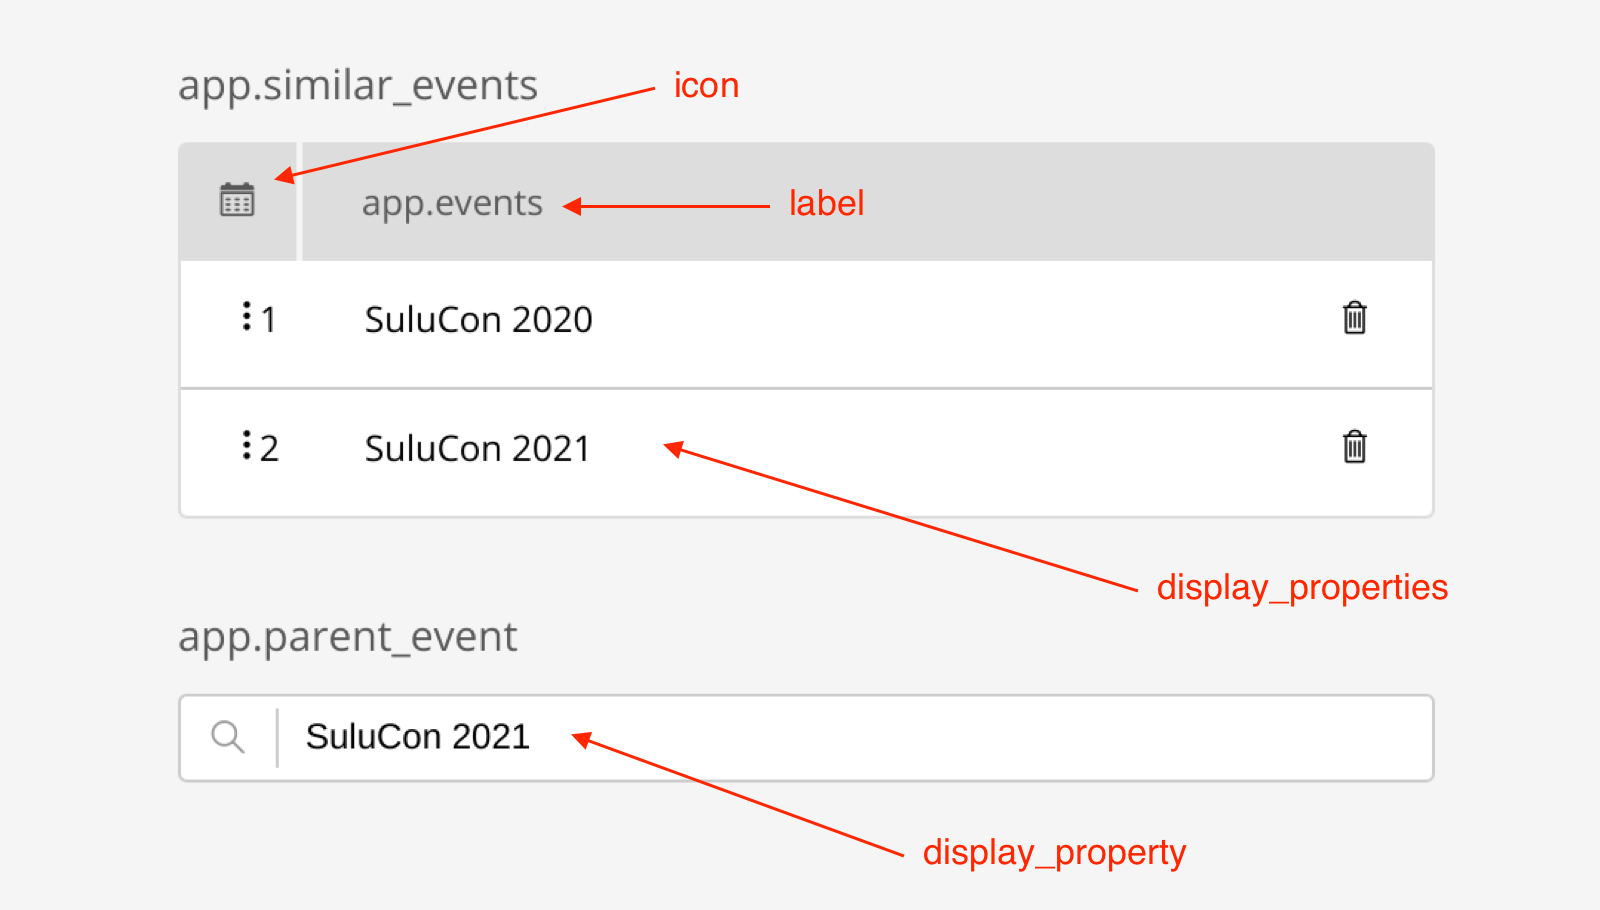
The auto_complete section has a display_property configuration (mind the singular naming) defining which
property of the selected resource is shown. The search_properties describe which of the properties from the
resource are used to filter by the entered auto complete text.
This configuration is all that is necessary to get a field type that can be used in the form XML. If we e.g. want to
add a selection for multiple events for similar events and an auto complete for selecting only one event representing
the parent then the /config/forms/event_details.xml would look like this:
<?xml version="1.0" ?>
<form xmlns="http://schemas.sulu.io/template/template"
    xmlns:xsi="http://www.w3.org/2001/XMLSchema-instance"
    xsi:schemaLocation="http://schemas.sulu.io/template/template http://schemas.sulu.io/template/form-1.0.xsd"
>
    <key>event_details</key>

    <properties>
        <!-- ... -->

        <property name="similar_events" type="event_selection">
            <meta>
                <title>app.similar_events</title>
            </meta>
        </property>

        <property name="parent_event" type="single_event_selection">
            <meta>
                <title>app.parent_event</title>
            </meta>
            <params>
                <param name="type" value="auto_complete" />
            </params>
        </property>
    </properties>
</form>
Note
This will show the fields in the form, but they will not properly save, because the REST API will not accept them yet. In order for this to be working you have to handle these fields in the REST API as well.
